一、背景介绍
最初发现 TimelineJS 是在 2014 年。为了制造一个惊喜,用它做了一个与爱人从相识到结婚的时间线。
转眼 2020,TimelineJS 也有了第三个版本。
对于平时有记录习惯的人来说,拥有一个关于自己的易读美观的故事线是一件非常有成就感的事,我自己便属于这类人。另一方面,TimelineJS 仍然非常小众,而且国内几乎没有对它的介绍和使用说明。本文的目的是便是能够把它的使用方法描述清晰。
TimelineJS 能做什么
TimelineJS 是 Northwestern University Knight Lab 社区的一个产品,它可以用来制作时间线(时间轴)的故事,元素支持文本、图片、音乐、视频、地图。官网罗列出的类型包括:
Twitter, Flickr, YouTube, Vimeo, Vine, Dailymotion, Google Maps, Wikipedia, SoundCloud, Document Cloud and more!
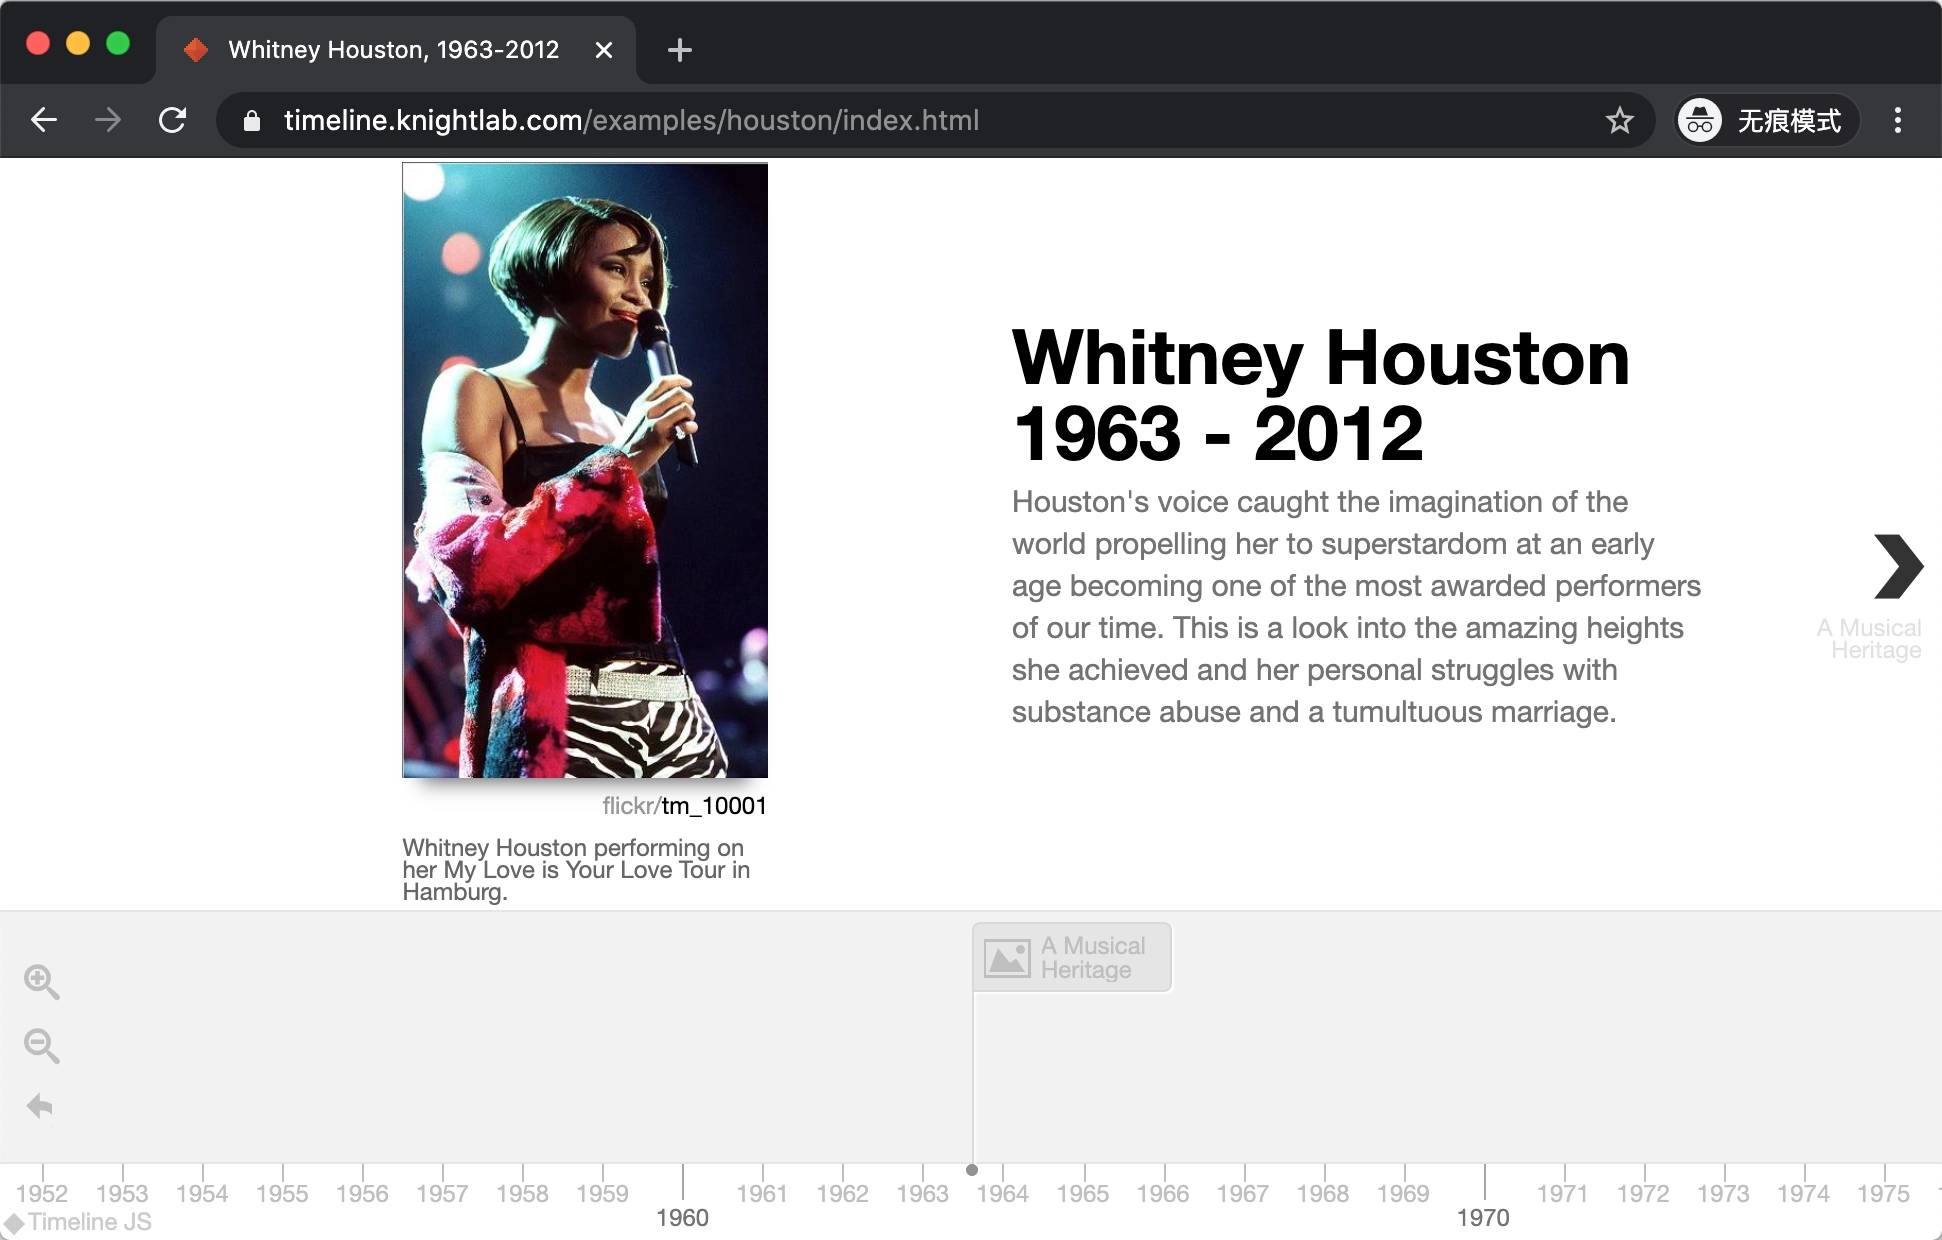
在官网上能看到几个示例,比如对美国歌手惠特妮·休斯顿的生平介绍:https://timeline.knightlab.com/examples/houston/index.html
本文适用的读者
TimelineJS 虽然适用简单,但如果你能够:
- 懂点前端知识;
- 懂点网站托管知识;
- 最好熟悉 JSON 语法;
- 最好能科学上网(不会也没关系,一样可以本地使用);
那么,TimelineJS 对你来说毫无门槛。
二、几种使用方法
要想使用 TimelineJS 制作故事线,需要从以下两个方面考虑:
- 故事线的数据存放到哪里
- 故事线的网页运行在哪里
幸运的是,这两个方面官方都考虑到了,使用 Google docs 来存放故事线的数据,Knight Lab 提供页面托管。只要按照这里的 4 个步骤 https://timeline.knightlab.com/#make 就能生成 Knight Lab 给你的一个链接。对于想尝试一下的人来说,这样就足够了,简单么!
但是,它实际上是支持以下三种组合使用的:
- Knight Lab + Google docs # 官方推荐,需科学上网
- 自己的页面 + Google docs # 可个性化定制页面,需科学上网
- 自己的页面 + JSON 文件 # 可个性化定制页面
第一种是上面官方推荐的用法。对于想要个性化定制页面的用户来说,就需要使用后两种方法了。对于不能使用 Google 服务的用户来说,就只能选择第三种方法了。
从隐私方面来考虑,一旦使用 Google docs 这种组合,就意味着需要把文档公开,所以对于不想公开故事线信息的人来说,最好的办法就是使用本地的 JSON 文件,也就是第三种组合。
接下来详细介绍一下后两种组合的使用方法。
三、详细使用
1. 自己的页面 + Google docs
按照 https://timeline.knightlab.com/#make 这里前两个步骤:
第一步、点击 这里复制一份时间线数据的表格模版;
第二步、把你的表格发布到网络后,复制表格的 URL;
第三步、创建一个自己的 HTML 页面,把第 16 行的链接替换为你自己表格的 URL:
<!DOCTYPE html>
<html lang="en">

<head>
    <title>Timeline</title>
    <meta charset="utf-8">
    <link title="timeline-styles" rel="stylesheet"
        href="https://cdn.knightlab.com/libs/timeline3/latest/css/timeline.css">
</head>

<body>
    <script src="https://cdn.knightlab.com/libs/timeline3/latest/js/timeline.js"></script>
    <div id='timeline-embed' style="width: 100%; height: 600px"></div>
    <script type="text/javascript">
        timeline = new TL.Timeline('timeline-embed',
            'https://docs.google.com/spreadsheets/d/1cWqQBZCkX9GpzFtxCWHoqFXCHg-ylTVUWlnrdYMzKUI/pubhtml');
    </script>
</body>

</html>
这样,在本地打开这个页面,就可以看到自己的故事线了。
2. 自己的页面 + JSON 文件
为了直接能从本地引用 timeline.js 和 css 文件,从这里 https://cdn.knightlab.com/libs/timeline3/latest/timeline3.zip 下载官方的编译后压缩包,解压到本地网页目录,重命名为
build。这时,你的网页目录应该是这样的:.
└── build
├── css
│ ├── fonts
│ ├── icons
│ ├── themes
│ └── timeline.css
├── embed
│ └── index.html
└── js
├── library
├── locale
├── timeline-embed-cdn.js
├── timeline-embed.js
├── timeline-min.js
└── timeline.js
接下来,创建一个时间线的 JSON 文件,可以直接下载 惠特妮·休斯顿 的示例,放到网页目录中,重命名为
data.json。
接下来,创建一个 HTML 文件,名字为
index.html,内容如下:<!DOCTYPE html>
<html lang="en">
<head>
<title>Timeline</title>
<meta charset="utf-8">
<meta name="apple-mobile-web-app-capable" content="yes">
<meta name="apple-touch-fullscreen" content="yes">
<!-- build:css https://cdn.knightlab.com/libs/timeline3/latest/css/timeline.css -->
<link title="timeline-styles" rel="stylesheet" href="./build/css/timeline.css">
<!-- endbuild -->
<!-- build:js https://cdn.knightlab.com/libs/timeline3/latest/js/timeline-min.js.js -->
<script src="./build/js/timeline-min.js"></script>
<!-- endbuild -->
<!-- Style-->
<style>
html, body {
height:100%;
padding: 0px;
margin: 0px;
}
</style>
</head>
<body>
<div id="timeline-embed">
<div id="timeline"></div>
</div>
<script>
$(document).ready(function () {
var embed = document.getElementById('timeline-embed');
embed.style.height = getComputedStyle(document.body).height;
window.timeline = new TL.Timeline('timeline-embed', 'data.json', {
hash_bookmark: false
});
window.addEventListener('resize', function () {
var embed = document.getElementById('timeline-embed');
embed.style.height = getComputedStyle(document.body).height;
timeline.updateDisplay();
})
});
</script>
</body>
</html>
这时,你的页面目录结构应该为:
.
├── build
│   ├── css
│   ├── embed
│   └── js
├── data.json
└── index.html
如果本地直接打开 index.html,会在页面的调试工具中看到跨域的错误:
Access to XMLHttpRequest at 'file:///path/to/your/data.json' from origin 'null' has been blocked by CORS policy: Cross origin requests are only supported for protocol schemes: http, data, chrome, chrome-extension, https.
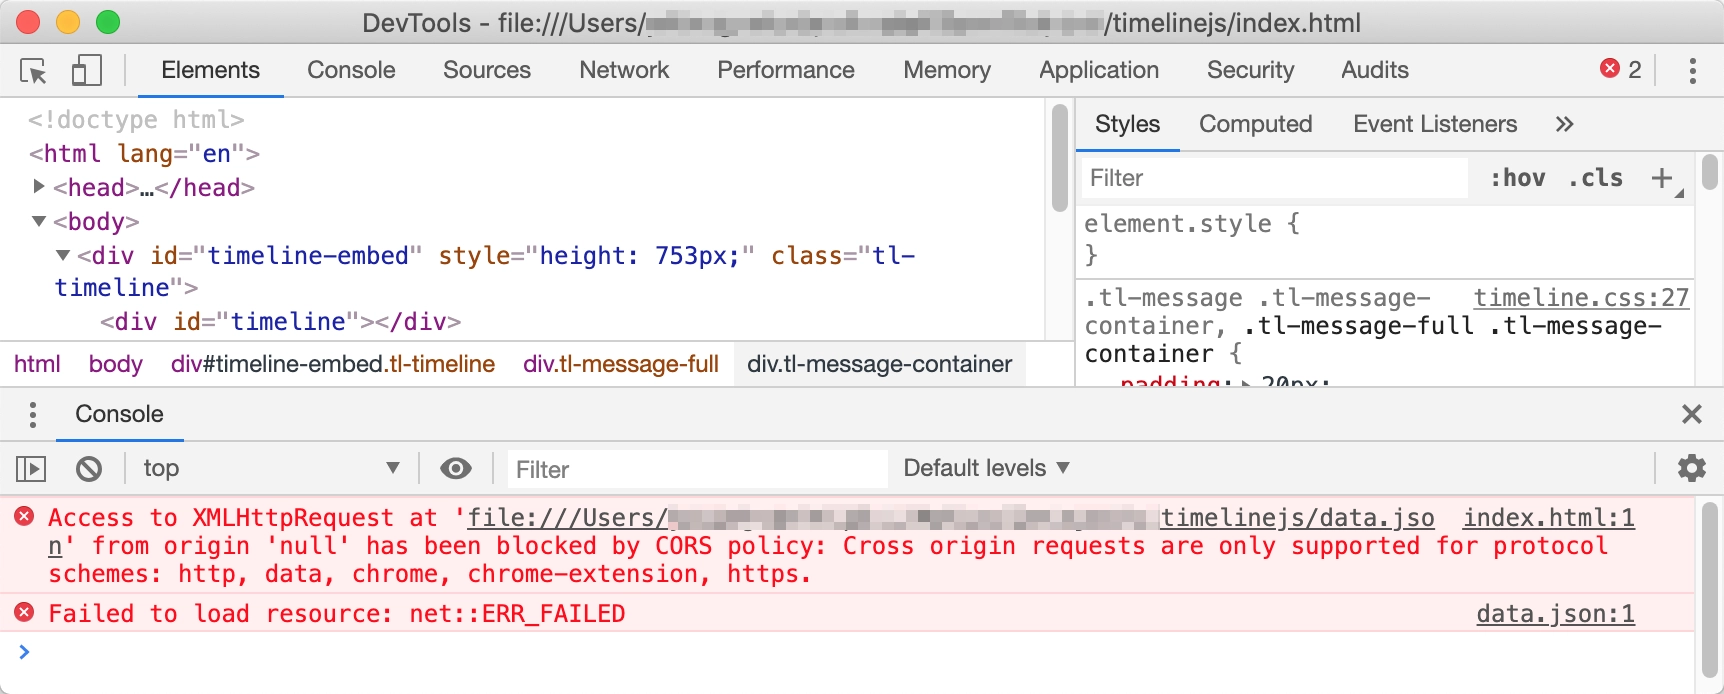
跨域错误的原因是 timeline.js 读取的 json 文件是本地文件,不是 http 这种 URL 的。要解决这个问题,可以考虑使用 http server 把页面托管起来。Windows 用户可以选择 Web Server for Chrome 扩展,把网页目录托管起来。当然 Linux 和 Mac 用户也可以这样用,既然你都用 Linux 或 Mac 了,就跟着我一起折腾吧。
接下来,我们尝试一下 Nginx 来托管静态页面,无需编译安装 Nginx,直接用 Docker 来运行即可。(前置条件:你要自己安装 Docker for Linux or Docker for Mac)
在网页目录新建一个
start-nginx-docker.sh 文件,内容如下:docker run --name timeline-nginx -v ${PWD}:/usr/share/nginx/html -p 8080:80 -d nginx
这时,你的网页目录应该是这样的:
.
├── build
│   ├── css
│   ├── embed
│   └── js
├── data.json
├── index.html
└── start-nginx-docker.sh
在该目录下,运行
sh start-nginx-docker.sh 命令,会自动下载 Nginx 最新的镜像并运行。
打开 http://127.0.0.1:8080 就能浏览了。
剩下的事,就是去修改你的 json 文件。
TimelineJS 的 JSON 中字段的意思都在这里进行了说明 https://timeline.knightlab.com/docs/json-format.html
四、个性化页面
自定义字体
TimelineJS 提供了几个预选字体集,如果使用内置的字体,可以在 HTML 中这样写:
<link title="timeline-styles" rel="stylesheet" href="https://cdn.knightlab.com/libs/timeline3/latest/css/timeline.css">
<link title="timeline-styles" rel="stylesheet" href="https://cdn.knightlab.com/libs/timeline3/latest/css/fonts/font.abril-droidsans.css">
font.abril-droidsans.css 可以替换为下面其他的字体:
font.abril-droidsans.css
font.amatic-andika.css
font.bevan-pontanosans.css
font.bitter-raleway.css
font.clicker-garamond.css
font.dancing-ledger.css
font.default.css
font.fjalla-average.css
font.georgia-helvetica.css
font.knightlab.css
font.lustria-lato.css
font.medula-lato.css
font.oldstandard.css
font.opensans-gentiumbook.css
font.playfair-faunaone.css
font.playfair.css
font.pt.css
font.roboto-megrim.css
font.rufina-sintony.css
font.ubuntu.css
font.unicaone-vollkorn.css
自定义选项
定义
additionalOptions 并在实例化 Timeline 的时候作为第三个参数传入。详细的个性化选项可以参考 https://timeline.knightlab.com/docs/options.html<script type="text/javascript">
var additionalOptions = {
start_at_end: true,
default_bg_color: {
r: 0,
g: 0,
b: 0
},
timenav_height: 250
}
timeline = new TL.Timeline('timeline-embed',
'https://docs.google.com/spreadsheets/d/1cWqQBZCkX9GpzFtxCWHoqFXCHg-ylTVUWlnrdYMzKUI/pubhtml',
additionalOptions);
</script>
五、还有什么
页面 + JSON 文件方式除了可以本地浏览,也可以部署到网络上,比如 github pages。
六、参考
HTML中使用 TimelineJS https://timeline.knightlab.com/docs/instantiate-a-timeline.html
Timeline JSON 字段说明 https://timeline.knightlab.com/docs/json-format.html
Timeline 个性化选项说明 https://timeline.knightlab.com/docs/options.html
评论
发表评论